
According to AccuWeather.com, there was supposed to be a dazzling Northern Lights display Saturday night due to a solar flare that occurred around 2 a.m. Thursday morning.
"Viewing conditions will be best in the mid-Atlantic, specifically for parts of Pennsylvania and the Delmarva. Most of the country will have poor to fair views as a result of cloud cover, with areas further south not experiencing the aurora at all."


The girls had fun swinging in the dark. I had my camera on night mode so I could get these shots....

....and for some reason, Sweetie Pie's head disappeared.....

...and then her upper body stared to fade away too...

I don't know enough about my camera to know why, but we all had a good laugh about it when I downloaded the pictures.
We never did see the northern lights, did you?
Anyway, about a month ago, I was the lucky winner of a giveaway hosted by Danielle over at 2 Little Superheros. I won a $50 store credit to Minted. From all the things I could have purchased, I chose this custom family tree art. It has my husband's and my initials in the center and the first and middle names of our three children around the rings (the one shown below is from the website, our initials and names are different).
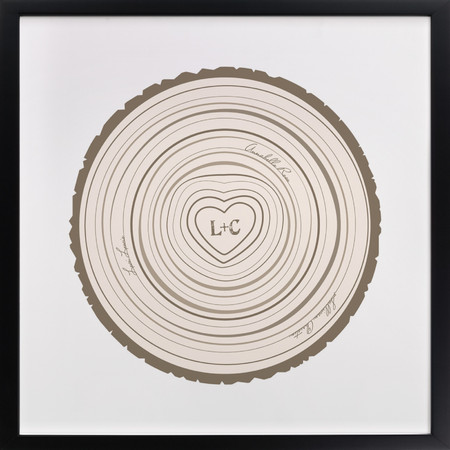
One of the deciding factors in what to choose was cost. Several larger pieces I liked were a hundred or two more than my credit. And since I didn't want to spend more than my store credit I finally decided up this little 8 x 8 inch work of art for $48. I also thought this piece would look great in our living room gallery wall with all the family pictures.
The customer service at Minted was great and I received my order in no time. All I needed was a frame. A square frame to be exact, which was something I didn't already have. Lucky for me a new Goodwill store opened up in town and I checked it out. There I found this square frame with a mat to fit an 8 x 8 picture for only $1.97. At least I thought it was an 8 x 8 mat opening.

I should have brought a tape measure or ruler with me to make sure because when I got home I put the artwork in it and realized, it was actually an 8.25 inch opening in the mat. I didn't like the color of the mat anyway and knew I was going to paint it, but how was I going to make it bigger, or the opening smaller? It finally dawned on me that I could cover the mat with either fabric or paper and leave a little extra room so the opening would be smaller. I decided to use a natural looking fabric that I had since it went well with the color of the tree art, plus I liked that the fabric looked 'natural' and the tree art is like something from nature.

I cut my fabric an inch or so bigger than my mat, and cut an X in the center being sure not to make the cuts all the way to the corners. That way the fabric mat can be larger than the existing paper mat. Then I cut a square out of the center of the X leaving about an inch of fabric to be glued to the mat.

I glued the inside fabric and then the outside fabric to the mat. I didn't worry about making my corners look neat since they would be covered up by the frame.

I also spray painted the frame Oil Rubbed Bronze to match some other ORB pieces in the gallery of pictures.

Then I hung it on the wall. I like how the three ORB pieces are all in a line (the R, our latest family picture, and the family tree art).

I also like how it fills in the gap between the shelves and the larger picture to the right.
Although I think there needs to be something under the shelf to the left of it, and maybe something small right above it. This gallery wall is slowing coming together over time.
Thanks for stopping by,
Christa
linked up to: flusterbuster.com and realcoake.com
