Click below to shop amazon and support my blog. Thank you!

Showing posts with label home decor. Show all posts

Monday, July 1, 2019

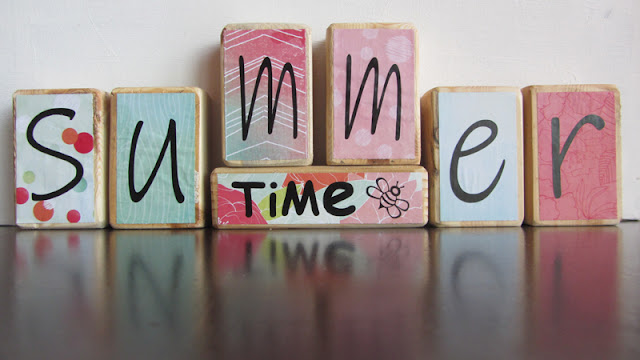
DIY Reversible Summer / 4th of July Blocks


We  had a craft day at church the other weekend and I was in charge of this craft.  Perfect for a summer time display.  It is super cute and super easy to make.


You need 7 blocks.  I think we had 2x4's cut into the following sizes (you don't have to be exact):
6 blocks cut to 2.5" by 4"
and 1 block cut at 2" by 6"


The blocks were sanded and left as is for our project, but you could stain or paint them if you wanted.

Then we used patriotic and summer colored scrapbook paper cut to fit inside the blocks.  6 patriotic colored papers and 6 summer colored papers were cut to 2 1/8th" by 3.5".  One patriotic paper and one summer paper was cut to 1 3/8" by 5.5".  

Vinyl lettering was cut out using my Silhouette machine and applied to each paper.

Then the paper was Mod Podged to the blocks.  I just applied Mod Podge to the block and then smoothed the paper on top.  You could also apply Mod Podge over the paper for a more durable or shinier finish.


I love a 2 for 1 decoration.  I have mine turned to summer right now but when July rolls around, I'll flip it to the patriotic side and then flip it back to summer to use until school starts.


The idea was found HERE and the possibilities are endless.  You could make these for Easter/Spring, Winter/Valentine's Day, or any holiday and season.  I love a simple, easy and versatile craft. 


Subscribe to CONTROLLING Craziness and get my blog updates via email.   Don't miss anymore posts, click HERE to get email updates.

And don't forget to follow me on FacebookTwitterGoogle+, and Pinterest.

Monday, April 29, 2019

Baseball Themed Decor


I shared on Facebook the other day a cute baseball themed door hanger.  I'm not a sports fan, don't watch it and don't play it, but this baseball theme was too cute.  I first saw it on Pinterest and clicked on it, so now Pinterest has a bunch of other baseball themed ideas for me, and you know how I love a theme.

Here's the original home plate door hanger

source

And here's a more personalized one
source
They look like they'd be simple to make.  Just cut out the shape, paint it and add vinyl lettering.


I also thought these baseball themed picture holders were cute. 

source
Twine can hold the picture in place or a clip.

source

And if baseball isn't your thing, you could easily paint them to represent other sports as well.

source


And what sport's loving kid wouldn't love a sports themed room with all the accessories.  From walls, to lights, curtain rods, bookends, lamps, door knobs and more the possibilities are endless - and easy to DIY with some paint and extra balls.


source

source

source

source

source

source

Now this might be taking it a bit far.  What do you think, a baseball themed bathroom?

source


I loved a good theme.  Whether it's for parties or kid's rooms, it's always fun to decorate and add a personal touch.


Subscribe to CONTROLLING Craziness and get my blog updates via email.   Don't miss anymore posts, click HERE to get email updates.

And don't forget to follow me on FacebookTwitterGoogle+, and Pinterest.

Friday, June 29, 2018

Airplane Prints


I wanted to do a follow up with all the information about these cute airplane prints that I used as decoration for the Airplane Themed Baby Shower I posted about earlier.  My sister is doing an airplane theme in the baby's room and I thought these prints would go perfect in there.  I found them HERE


At first I thought I could used the white pen in my Silhouette machine to print these out on navy card stock, but nope.  Instead of drawing the plane with the white pen, the Silhouette machine traced where the lines should have been.  You can see what I mean below.  I googled all about it and didn't find a way to fix it.


So I just had them printed out at Walmart and they turned out great.  


I ordered some industrial looking frames to go with the industrial airplane look of the baby's room, but they didn't come in before the baby shower so I used some white wooden frames that I had.  I like the white frames with the white airplane on the navy background.


Here they are in the metal frames and I love that look too.


You could also print them out at home in a black and white version which looks great too.  


Thanks so much to Nest For Less for sharing her vintage sketch airplane posters with us.


Subscribe to CONTROLLING Craziness and get my blog updates via email.   Don't miss anymore posts, click HERE to get email updates.

And don't forget to follow me on FacebookTwitterGoogle+, and Pinterest.

Monday, July 17, 2017

Spray Paint a Lamp Shade for a Custom Look


When it comes to decorating, I feel like I bounce around from room to room never finishing one space before starting the next.  And by the time I go back to a room that I've started decorating, I've changed my style and want to do something different.  Anyone else have that problem?  

For my 2 year old son's room, I decided to do a red and blue color scheme.  He has blue bedding and curtains so all I had to do was put in some red.  I had a lamp on his dresser but didn't like the lamp shade so I bought a drum shade at a thrift store.  I was planning to paint it anyway even though it was pretty close to the color I wanted.  If you look closely you'll notice that it had faded on one side.  Like I said, not a big deal because I was going to paint it.  


The photo above is the before and the photo below is the after.  


You can see how much richer and brighter the color is in the before and after comparison below.


I love when things match, and by match I mean match exactly.  I used the same color to spray paint several picture frames.  Don't mind the wall stickers behind some of the pictures.  They were from when this room was my daughter's nursery.  If I take those off, the paint comes off too and I'm not ready to paint this room.


I just love this caricature of my little guy.  Those dimples and sly smile capture his personality perfectly.


Now each side of his room has a bit of red.  I love being able to customize a color scheme using something as simple and easy as spray paint.  And if I want to change color schemes in a few years (or months) it will be cheap and easy to do.


Subscribe to CONTROLLING Craziness and get my blog updates via email.   Don't miss anymore posts, click HERE to get email updates.

And don't forget to follow me on FacebookTwitterGoogle+, and Pinterest.

Friday, May 26, 2017

From Blanket to Valance

The window in the girls' room had a very dark purple valance on it.  It looked a bit too formal in a kid's room, plus I wanted to lighten things up a bit.  Last year (yes, this is another long overdue post) I bought this cool Ofelia blanket from Ikea.  Ikea sells something with the same name, but it's a different type of material.  The actual blanket I have can be found on amazon.com HERE.  It's more of a gauzy delicate fabric where the one Ikea sells now is a thicker yarn like fabric.  Of course, I wasn't planning to use it as a blanket anyway.  I knew all along it would make the perfect light and airy and oh so feminine valance I'd been looking for.  Just perfect for a little girl's room.


Here is the dark purple valance that I started with.


And here's the new light and airy valance that's in the girls' room now.  I like it so much better.  It really brightens up the space too.


For starters, I took down the old valance and removed the old curtain rod. 


I hung the new curtain rod up a little higher so the valance would hang higher allowing more of the window to show and add even more light to the room.  I'm not too worried about the holes in the wall where the old curtain rod was.  Eventually I'll get to painting the room but for now, the new valance should cover them up.  I just so happened to have this flowered curtain rod so I used that which also added a little more of a feminine touch to the room.  


First I draped the blanket over the curtain rod.


I  used some ribbon to sew loops to hold up part of the blanket.


The ribbon loops were made from the same ribbon I used to make the girls barrette holder.  You can read all about how I did that over at THIS POST.

Adding the loops of ribbon turns it from a blanket into a valance.


I love a good before and after.  In person it looks so much better with the new valance just letting all that sunlight stream in.


Subscribe to CONTROLLING Craziness and get my blog updates via email.   Don't miss anymore posts, click HERE to get email updates.

And don't forget to follow me on FacebookTwitterGoogle+, and Pinterest.