Click below to shop amazon and support my blog. Thank you!

Showing posts with label sewing. Show all posts

Thursday, January 17, 2019

Minnie Mouse Crochet Purse


My teenage daughter is so creative and crafty.  Remember how she carved/decorated her Halloween pumpkin HERE?  Well, she learned to crochet last year and has made a few things besides hats and scarves.  She doesn't even follow a pattern.  She knows some basic stitches and when she sees something she likes, she just starts making it.  

And that is exactly what she did with this Minnie Mouse purse.  


Her 2 year old cousin loves Minnie Mouse so she made this for her as a Christmas gift.  Good thing my daughter got some yarn as an early Christmas present.  


She found her inspiration on Pinterest HERE.

And just so her cousin's baby brother wouldn't feel left out, my daughter crocheted him a hat.

If you're wondering about those brightly colored baby toys, they are THE perfect baby gifts.  You can find them HERE and HERE.  They will keeps babies entertained at home and on the go.  Perfect to stash in your purse or leave in the car or stroller.  Oh, and older kids like them too.  My 4 and 8 year old kept playing with them after I bought them, so I had to quickly gift wrap them.


Subscribe to CONTROLLING Craziness and get my blog updates via email.   Don't miss anymore posts, click HERE to get email updates.

And don't forget to follow me on FacebookTwitterGoogle+, and Pinterest.


Saturday, December 3, 2016

Reversible Holiday Headbands


It's been a while since my last post and we've had a whirlwind of a Thanksgiving holiday.  A few weeks before Thanksgiving we decided that since the kids had the whole week off school (which rarely happens) that we'd drive to Wyoming to visit my in-laws.  About 70 hours round trip with 4 kids - are we crazy or what?  It actually wasn't that bad.  The 2 year old was our biggest concern and he did great the majority of the time.  We made the trip 4 years ago with one less kid and I vowed to never do it again.  This time the kids were so great, that we are actually planning to go back.  You can click HERE, HERE and HERE to read about our last road trip out west.

Anyway, on to the DIY project.  
Last month my older daughter wanted to do something crafty and asked to check Pinterest.  We found THIS post about how to make these cute reversible fabric headbands.  We decided to make a fall/Christmas one and to make one for each of the girl cousins we'd be seeing on our road trip.  So 3 hours later we had whipped up 8 of these cuties:


We also bought lots of other fabric at the fabric store to make a bunch more in colors to match my daughter's outfits.  I'm just glad we got the fall/Christmas headbands done in time, not sure when we'll get to the rest.  We might have been a little over ambitious in wanting to make so many.  


Fall/Thanksgiving themed headbands:

I love that they are Reversible!

Christmas headbands:

My youngest daughter loves gold, so we made a gold one for her too.  Didn't make this reversible or as thick and it turned out just as cute.

Here are some of the cousins modeling their new headbands just in time for Thanksgiving:

Now that Thanksgiving is done, we can officially switch things over to Christmas.


PIN THIS to make your own!


Subscribe to CONTROLLING Craziness and get my blog updates via email.   Don't miss anymore posts, click HERE to get email updates.


And don't forget to follow me on FacebookTwitterGoogle+, and Pinterest.

Friday, September 18, 2015

Upcycled Mermaid Skirt


I mentioned how my daughter wanted a Mermaid Birthday party.  Not Ariel from the Little Mermaid, just Mermaids.  To go with the mermaid theme, I made her a mermaid dress up skirt.  I actually used a too-small dress up outfit to make a mermaid skirt for my daughter and one for her doll.


I believe this was an Island Princess Barbie dress up outfit.  


I cut off the end of one of the sleeves and used that as the skirt for the doll.  Since the sleeve was sheer, I used some teal fabric I already had to line it.  Then I sewed the elastic in at the waist.  This was pretty simple, even for me.  I wish my daughter's skirt was as simple to make.


For my daughter's skirt, I cut out the frilly lining on the inside of the dress up outfit.  Again, I used the teal fabric I already had to be the bodice of the skirt.


I made and elastic waist and attached the teal skirt to the gathered frilly part.  This was easier said than done, but after several attempts, I finally got it to work.


My daughter was so excited to have her own mermaid skirt.  It's plenty long so she can wear it for a couple of years.


If you want to check out the rest of her mermaid themed birthday click HERE to see how I made an ocean / mermaid birthday cake,

and for a tutorial about how I made the fleece mermaid blanket just click HERE.


Subscribe to CONTROLLING Craziness and get my blog updates via email.   Don't miss anymore posts, click HERE to get email updates.


And don't forget to follow me on FacebookTwitterGoogle+, and Pinterest.

Tuesday, September 8, 2015

Mermaid Blanket

The Babes has been into mermaids for almost a year now.  So I decided to help her in her desire to become a mermaid by making her this mermaid blanket.


I turned to Pinterest for ideas.  I found lots of crocheted mermaid blankets but since I don't know how to crochet, I opted for an easier method.  This blanket was made using fleece material.  My daughter said she wanted to be a rainbow mermaid and we lucked out finding this rainbow scalloped fabric at the store.  I cut it into a mermaid tail shape and sewed up the sides forming a long tube.


For the top of the mermaid blanket, I folded over the top of the fabric and sewed it up leaving a hole to insert more fabric so it would puff out.


For the tail part of the mermaid blanket, I used coordinating fabric cut into a fin shape.  I sewed the two fin pieces together leaving the top open so I could stuff it with additional fleece for a puffy tail.  Once the tail was stuffed, I sewed it shut and then sewed it to the bottom of the 'tube' part.
  

And voila!  A mermaid blanket.  I made it long so my daughter could use it for a couple of years.


 Here she is trying it out.  


And here she is acting like a mermaid.  


I figure this will be great for her to snuggle in while watching a movie or reading a book on the couch.


Subscribe to CONTROLLING Craziness and get my blog updates via email.   Don't miss anymore posts, click HERE to get email updates.


And don't forget to follow me on FacebookTwitterGoogle+, and Pinterest.

Wednesday, July 15, 2015

Travel Toothbrush Holder

This summer hasn't gone according to plan, but that's OK, we're going with plan B.

You see, the Spencinator was supposed to go to a 5 week therapeutic day camp.  After the first day, the camp counselors called me to come get him.  He didn't want to participate with the group much less be in the group.  Not surprising, the kid has autism so of course he hates being in a group.  I would have thought this camp would have been able to deal with it, after all they were a therapeutic camp with lots of other kids on the spectrum.  Anyway, after trying to incentivise him to go, we realized it wasn't going to work out.  So instead of having him occupied during the day for five whole weeks, he's now home to torture his sisters.  Just kidding, not really.  That means I've got to be on the ball and keep the kids busy so there's no time for fighting.  Not an easy task.  

I'm lucky my mom is now retired and has more time to help out.  Every other week she is having one of the kids stay at her house for "Grandma Camp".   They love it and I love it.  Not only do they get some one on one time to be spoiled by their grandparents, but they also get some time to be an only child for a while.  And the rest of us at home get a break from some of the sibling rivalry.  It's a win win for everyone.  

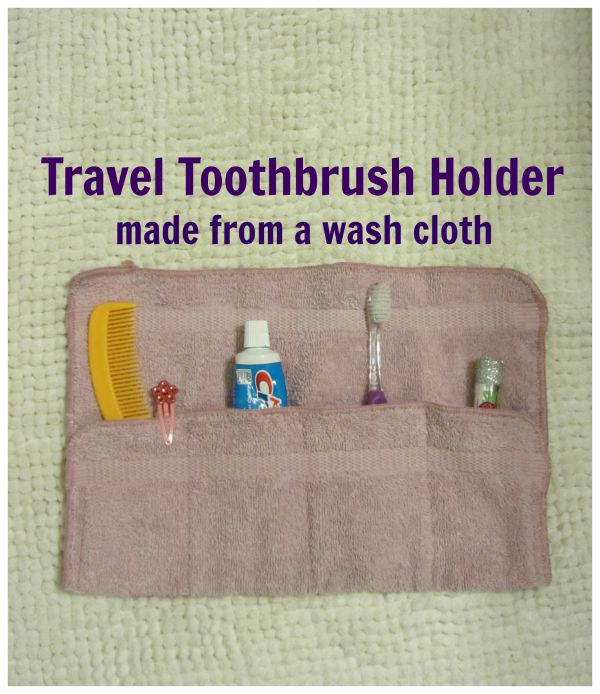
With all this traveling, I've had to pack overnight bags for the kids.  I've been using something I made a while ago to store their toothbrush and toothpaste.


It started out as a regular old wash cloth.  I folded the bottom 1/3rd of the wash cloth up and sewed some vertical lines to make little pockets.  


Toothbrush, toothpaste, floss, chapstick and even a comb or brush can fit inside and roll up neatly to pack into their suitcase.  It keeps everything organized and in one easy to find place.


Subscribe to CONTROLLING Craziness and get my blog updates via email.   Don't miss anymore posts, click HERE to get email updates.


And don't forget to follow me on FacebookTwitterGoogle+, and Pinterest.


Monday, June 1, 2015

DIY Duvet Cover

It seems like I'm always changing things around.  Before I show you the 'new' rooms, I thought I better show how things used to look.

About three years ago, my mother in law moved in with us and we bunked up our then 2 year old girl with our 10 year old boy.  We didn't bunk the girls up because our 8 year old daughter loves to draw and had art supplies all over her room.  I was afraid the 2 year old would color everything if left in that room, so we put her where she couldn't do much damage and that was with her older brother.  They got along great, sometimes too great as they would play and not sleep, but for the most part it worked out.  

As time passed and the kids matured (a little), we decided to bunk up the girls.  Our youngest daughter loved the idea since she adores her big sister, but our older daughter wasn't liking having to share a room.  So I decided to let her design the new shared room.  She wanted a horse theme.  We found these sheets at Garnet Hill.  Not the cheapest set of sheets and I needed two since the younger daughter wanted to have a bed just like her sister's.  Rather than also buying the duvet cover or comforter, I decided to make my own duvet cover out of the top sheet.  The girls don't use their top sheets and it just ends up smooshed down at the bottom of the bed anyway.  I used a plain colored top sheet as the underside of the duvet cover.  I had a light pink one for our older daughter, but our younger daughter wanted purple so I had to go out and buy one.  The cost of these two sheet sets was around $100, plus $10 for an additional sheet set (at Walmart it was cheaper to buy a purple sheet set than to buy just a flat sheet).  Figuring I used half the sheet set to make the duvet, the cost worked out to about $26 per duvet cover.  Not too bad.  And it matches the sheets and pillowcases so I love it even more.    


It was pretty simple to make.  The only snag was that the horse flat sheet was longer and wider than the pink flat sheet.  The difference in length didn't really matter as I just sewed the end closed with the bottom seam having the extra fabric.  The wider width problem was solved by sewing the sides together to create a tube before sewing the bottom.  This caused some of the top horse sheet to fold over onto the underside of the duvet.  Not a big deal since you can't tell when the bed is made.  As for the opening, I just left about a foot in the center of the top seam open to stuff the duvet in.  The sheets are folded inward to create a wide seam and that keeps you from seeing the duvet inside.  


And my daughter loves it.

After a few weeks of use, the duvet inside kept shifting.  It just wasn't staying in place.  So I figured out a way to fix that.  


For the top bunk, I had a duvet inside the cover.  For the bottom bunk, I had an old comforter inside the duvet cover.  This left me with two different ways to attach the duvet to the cover to prevent it from shifting around.  

The duvet has these little loops in each corner.  I just sewed some white ribbon into the corners of the duvet cover (I did this by hand) and tied the ribbon into a bow, being sure to slip it through the loop of the duvet.  That is show in the top two pictures below.  The bottom two pictures show you could tie the ribbon around the corners of the duvet or comforter, if the duvet doesn't have the loops.  This quick fix has been keeping the duvets in place for weeks.


So there you have it, how to make duvet covers and how to keep the duvets inside from shifting.
I'd love to show you more of my girls'  horse themed bedroom.  And just so you don't think a horse themed bedroom just has horse sheets, I've also done a few horse themed DIY projects in there.  But I've changed things around already.  My mother in law moved out last month and rather than put the baby in that room, we decided to put our youngest daughter in there -- for now anyway.  I'll explain it all in another post later this week.  


Subscribe to CONTROLLING Craziness and get my blog updates via email.   Don't miss anymore posts, click HERE to get email updates.


And don't forget to follow me on FacebookTwitterGoogle+, and Pinterest.

Thursday, March 26, 2015

Lengthen Pants Without Sewing

This is a great trick to lengthen pants without having to whip out the sewing machine.  Not only does it make your pants look longer if they are too short, but it makes your legs look longer too.  Let me explain......

The other day my daughter was about to leave for school when I noticed her pants were too short.  Now I suppose she could have changed pants, but they matched her shirt and she didn't want to.  So I came up with a way to make them look less short.  

Here are some before and after shots so you can see how dressing in all one color makes her legs appear longer, and her pants longer since there isn't a different color to break things up.


More before and afters.  This not only works for kids, but can work for adults too - even if you're wearing a skirt or dress (just keep reading to find out how)...


You can also use this trick to make your legs look longer.  By dressing in all one color for pants, socks and shoes, it doesn't break up your legs, thus creating a lengthening effect.  Don't believe me, check out THIS article which has fashion tips to make you look taller.  #7 is about the all one color look.  Or THIS article about how to get longer looking legs, the 2nd thing mentioned is to match your shoes to your pants or your skin tone if you're wearing a skirt.


So has anyone ever tried this trick before?


Subscribe to CONTROLLING Craziness and get my blog updates via email.   Don't miss anymore posts, click HERE to get email updates.

And don't forget to follow me on FacebookTwitterGoogle+, and Pinterest.