Click below to shop amazon and support my blog. Thank you!

Showing posts with label bedroom. Show all posts

Monday, June 3, 2019

DIY Word Art for Girls


As mentioned in my last post it's been 9 months since we moved to our new home.  My two girls are no longer sharing a room so I have two girly rooms to decorate.  My youngest loves all things glittery gold and pink.  She requested a pink and gold unicorn room.  I'm happy to report that I'm almost done.  There are a few little things I want to do/make but for the most part, it's done.  Since we reused zero of the art/pictures from their shared horse themed bedroom, she needed some new art on her walls.  We browsed through Pinterest to see what I could make.  

She liked these two ideas:


They are sold on Etsy (HERE and HERE), but I knew I could make them cheaper.  Here are my versions:


I used 12 x 16 canvas boards and spray painted them with Krylon "ballet slipper" pink spray paint.  Then I just cut out and applied the vinyl.  I used a bright vinyl sampler pack for the first wall art and a glitter gold vinyl for the second wall art.  I hung them up with Command Strips.  (Amazon affiliate links provided for your convenience in case you want to make these too.  I receive a small commission when you purchase from my site.  Thank you.)


They were pretty easy to make except for the part where my vinyl didn't want to come off the paper backing.  That gold glittery vinyl was a pain to work with.  Other than that, it was a quick and easy way to customize her room.  I'm pleased with how it turned out and can't wait to show you the rest of her room including how I got away with not having to paint her walls pink yet her room still looks pink!  


Subscribe to CONTROLLING Craziness and get my blog updates via email.   Don't miss anymore posts, click HERE to get email updates.

And don't forget to follow me on Facebook, Twitter, Google+, and Pinterest.

Tuesday, May 21, 2019

Bunkie Board Makeovers


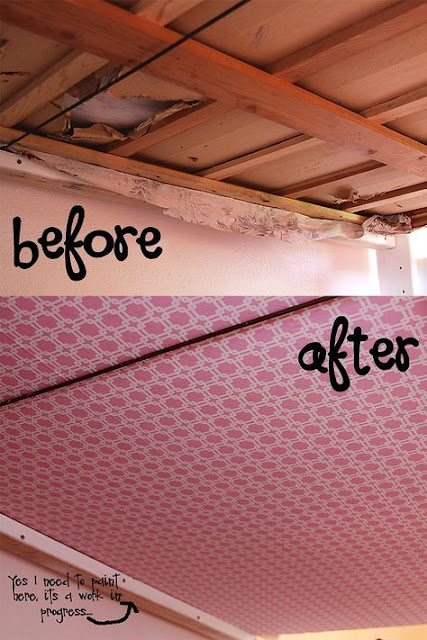
Since we moved 9 months ago (has it been that long already!), my girls no longer share a bedroom which means the bunk beds have been un-bunked, or should it be de-bunked?  Whatever the case, we no longer have bunk beds.  But.... when we did, I wanted to do a little makeover to the bunkie board of the top bunk which is what you see when you are on the bottom bunk.  Obviously I never got around to that.  Tell me I'm not the only one who takes years to do a project?

The easiest thing to do with the supplies I had on hand would have been to paint it.  My older daughter loves to paint and I was going to let her have at it.  We talked about painting some kind of sky scene so my younger daughter who slept on the bottom bunk would have feel like she's sleeping outside.


I couldn't find any painted bunkie boards on Pinterest, but did find several other ideas.  Here's some coordinating fabric wrapped around the top bunkie board for a custom look:

source

source

Or how about adding some lighting:

source

You could always go with curtains for fun and privacy:

source

While it is easiest to put curtains on the bottom bunk, the top bunk can get them too:


Anyone else fancy up the bunkie board of their bunk beds?  I'd love to see your ideas.


Subscribe to CONTROLLING Craziness and get my blog updates via email.   Don't miss anymore posts, click HERE to get email updates.

And don't forget to follow me on Facebook, Twitter, Google+, and Pinterest.

Monday, July 17, 2017

Spray Paint a Lamp Shade for a Custom Look


When it comes to decorating, I feel like I bounce around from room to room never finishing one space before starting the next.  And by the time I go back to a room that I've started decorating, I've changed my style and want to do something different.  Anyone else have that problem?  

For my 2 year old son's room, I decided to do a red and blue color scheme.  He has blue bedding and curtains so all I had to do was put in some red.  I had a lamp on his dresser but didn't like the lamp shade so I bought a drum shade at a thrift store.  I was planning to paint it anyway even though it was pretty close to the color I wanted.  If you look closely you'll notice that it had faded on one side.  Like I said, not a big deal because I was going to paint it.  


The photo above is the before and the photo below is the after.  


You can see how much richer and brighter the color is in the before and after comparison below.


I love when things match, and by match I mean match exactly.  I used the same color to spray paint several picture frames.  Don't mind the wall stickers behind some of the pictures.  They were from when this room was my daughter's nursery.  If I take those off, the paint comes off too and I'm not ready to paint this room.


I just love this caricature of my little guy.  Those dimples and sly smile capture his personality perfectly.


Now each side of his room has a bit of red.  I love being able to customize a color scheme using something as simple and easy as spray paint.  And if I want to change color schemes in a few years (or months) it will be cheap and easy to do.


Subscribe to CONTROLLING Craziness and get my blog updates via email.   Don't miss anymore posts, click HERE to get email updates.

And don't forget to follow me on Facebook, Twitter, Google+, and Pinterest.

Friday, May 26, 2017

From Blanket to Valance

The window in the girls' room had a very dark purple valance on it.  It looked a bit too formal in a kid's room, plus I wanted to lighten things up a bit.  Last year (yes, this is another long overdue post) I bought this cool Ofelia blanket from Ikea.  Ikea sells something with the same name, but it's a different type of material.  The actual blanket I have can be found on amazon.com HERE.  It's more of a gauzy delicate fabric where the one Ikea sells now is a thicker yarn like fabric.  Of course, I wasn't planning to use it as a blanket anyway.  I knew all along it would make the perfect light and airy and oh so feminine valance I'd been looking for.  Just perfect for a little girl's room.


Here is the dark purple valance that I started with.


And here's the new light and airy valance that's in the girls' room now.  I like it so much better.  It really brightens up the space too.


For starters, I took down the old valance and removed the old curtain rod. 


I hung the new curtain rod up a little higher so the valance would hang higher allowing more of the window to show and add even more light to the room.  I'm not too worried about the holes in the wall where the old curtain rod was.  Eventually I'll get to painting the room but for now, the new valance should cover them up.  I just so happened to have this flowered curtain rod so I used that which also added a little more of a feminine touch to the room.  


First I draped the blanket over the curtain rod.


I  used some ribbon to sew loops to hold up part of the blanket.


The ribbon loops were made from the same ribbon I used to make the girls barrette holder.  You can read all about how I did that over at THIS POST.

Adding the loops of ribbon turns it from a blanket into a valance.


I love a good before and after.  In person it looks so much better with the new valance just letting all that sunlight stream in.


Subscribe to CONTROLLING Craziness and get my blog updates via email.   Don't miss anymore posts, click HERE to get email updates.

And don't forget to follow me on Facebook, Twitter, Google+, and Pinterest.


Monday, November 16, 2015

Hide That Box Spring

Today's quick and easy post is sponsored by my son's bedroom.

You see, his mattress sits on top of a box spring.  His sheets are white but the box spring is a pastel peachy color.  Not the look we are going for in his masculine Minecraft bedroom.  


Lucky for me I had an extra white fitted sheet.  I used that to cover the box spring and now it looks so much better.  See for yourself in the before and after shot below:


You can always make the bed so the box spring doesn't show, but he likes to have his comforter folded over at the top so the pillows show and that leaves the box spring exposed.  No more naked box spring here.  Now the bed has a more finished look to it.

It's been almost a year since I switched up the bedrooms and gave my son's a Minecraft makeover.  I still owe you the details about that.  One of these days I'll get around to it, for now here's a sneak peak.


Subscribe to CONTROLLING Craziness and get my blog updates via email.   Don't miss anymore posts, click HERE to get email updates.


And don't forget to follow me on Facebook, Twitter, Google+, and Pinterest.

Monday, June 8, 2015

Even Superman Needs a Dad

I love this picture.  It's perfect for a little boy's room.  It's called "Even Superman Needs a Dad" by Liz Lemon Swindle*


The story on the back of the picture reads:


This is the picture above the baby's crib.  I had to take down the previous picture because it was too big once I added the dresser.

You see, we did some rearranging of the kids rooms, namely spitting up the girls.  You can read all about it in my last post.  In that post, I mentioned that I took the tall skinny dresser out of the girls shared room and put it into the sitting room of our master bedroom where we have the nursery set up for our baby.  It looks so much nicer than the plastic shelves that were in there.


The only problem was that the dresser hit the large picture on the wall.  I took that picture down and replaced it with one that is too small for the space but will just have to do.  


I think that's enough rearranging for now.  So far having the girls separated has worked out great.  Bedtime has gone smoother and our youngest daughter has been sleeping in, not waking up till the older two have already left for school.  I am hoping this allows everyone to sleep in during the summer.  Realistically, the older 3 kids will be the ones sleeping in because this little guy is used to getting up super early.


*this post contains an affiliate link. 

Subscribe to CONTROLLING Craziness and get my blog updates via email.   Don't miss anymore posts, click HERE to get email updates.


And don't forget to follow me on Facebook, Twitter, Google+, and Pinterest.


Thursday, June 4, 2015

Girls Rooms

As I mentioned in my previous post about how to DIY a duvet cover and keep it in place, I have rearranged the girls' bedrooms.  We had them bunked up while my mother in law was living with us.  Since my mother in law moved out last month we've had an empty bedroom.  Eventually we plan to put the baby in there, but since he's still not sleeping through the night (he's up about every 2 hours and I don't feel like walking down the hall to check on him and nurse him) he's staying in our room.  We have plenty of room in our master bedroom for his crib and things so it's not a big deal.  

Now back to the girls' bedroom.  They had been sharing a room which was working out great for our younger daughter, but our older daughter has been wanting more privacy.  She's 10 and doesn't like having a 4 year old watch her get dressed each morning.  Plus they'd get into arguments about silly stuff and lots of attitude would ensue.  The teenage years are starting early in our house.

After my husband witnessed the morning drama one day, he said it's not working out having those two share a room.  While he was at work, I went to work.  First I called my mom to talk through my plans.  It always helps me talk things out with someone else who can envision it with me.  After she agreed with me, I got to work giving each girl their own room.  


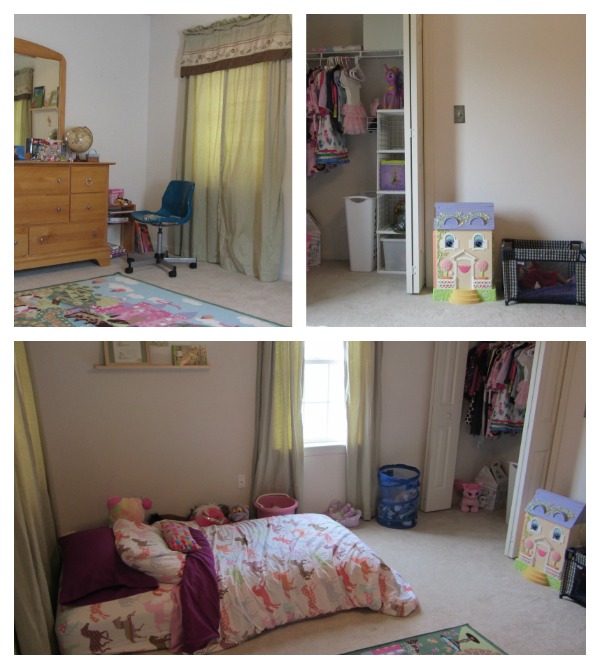
These pictures show what the girls room looked like before.  Two girls sharing a room means lots and lots of stuff.  The floor was always covered with our younger daughter's blankets and stuffed animals.


The closet wasn't that bad though.  I guess because most of their clothes are in their dressers.


I started by removing the mattress from the bottom bunk and placing it into the empty room (younger daughter's new room).  


Next up I moved over all her stuffed animals and toys.  I also put the rug in the new room.  What a difference it's made.


Here's some before and after shots:


Since there was already a dresser in the 'new' room, I used that dresser for my daughter's clothes and put the tall skinny dresser that was in her 'old' room, into our master bedroom for the baby.  That will be a post for another day though.

Here is what the 'new' room looked like.  It just had a dresser in there, the bean bag from the girls' room, a chair and music stand.  The curtains and bunny rabbit wall stickers were in there since this was our youngest daughter's nursery before my mother in law moved in.  Since this is temporary, I'm not going to paint or change the decor (yet).


And here it is after moving our youngest daughter in.  


Since this is just temporary I didn't even bother to take apart the bunk beds so our 4 year old just has her mattress on the floor which she has been loving.

Next up, I'll share pictures of the updated baby space in our master bedroom so stay tuned.


Subscribe to CONTROLLING Craziness and get my blog updates via email.   Don't miss anymore posts, click HERE to get email updates.


And don't forget to follow me on Facebook, Twitter, Google+, and Pinterest.