Click below to shop amazon and support my blog. Thank you!

Monday, July 1, 2019

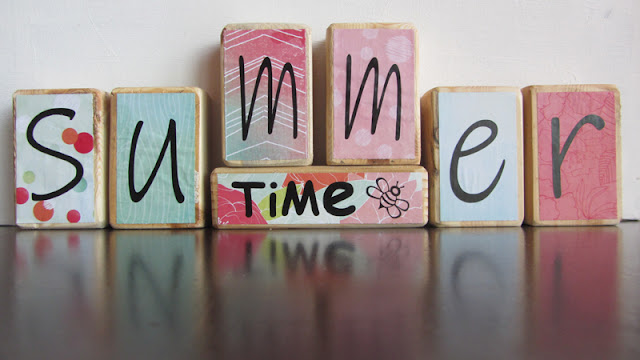
DIY Reversible Summer / 4th of July Blocks


We  had a craft day at church the other weekend and I was in charge of this craft.  Perfect for a summer time display.  It is super cute and super easy to make.


You need 7 blocks.  I think we had 2x4's cut into the following sizes (you don't have to be exact):
6 blocks cut to 2.5" by 4"
and 1 block cut at 2" by 6"


The blocks were sanded and left as is for our project, but you could stain or paint them if you wanted.

Then we used patriotic and summer colored scrapbook paper cut to fit inside the blocks.  6 patriotic colored papers and 6 summer colored papers were cut to 2 1/8th" by 3.5".  One patriotic paper and one summer paper was cut to 1 3/8" by 5.5".  

Vinyl lettering was cut out using my Silhouette machine and applied to each paper.

Then the paper was Mod Podged to the blocks.  I just applied Mod Podge to the block and then smoothed the paper on top.  You could also apply Mod Podge over the paper for a more durable or shinier finish.


I love a 2 for 1 decoration.  I have mine turned to summer right now but when July rolls around, I'll flip it to the patriotic side and then flip it back to summer to use until school starts.


The idea was found HERE and the possibilities are endless.  You could make these for Easter/Spring, Winter/Valentine's Day, or any holiday and season.  I love a simple, easy and versatile craft. 


Subscribe to CONTROLLING Craziness and get my blog updates via email.   Don't miss anymore posts, click HERE to get email updates.

And don't forget to follow me on FacebookTwitterGoogle+, and Pinterest.

Wednesday, June 26, 2019

Bus Driver Appreciation


The other day I shared my kids' teacher gifts, and I'm back to share the cute little card we made for our bus driver.  Our bus driver meets my kids with a smile each morning and afternoon.  She has gone out of her way to make sure the kids are safe and the best part is that she picks them up and drops them off right in front of our house.  That is great for the many cold and snowy NY winter mornings.  

To show our appreciation, we made these cute bus cards.


It started with this printable I found HERE.


I took it one step further and made a card out of it with some Extra gum inside.  I love the play on words and it's so appropriate for our bus driver.


Using yellow card stock, I made a pocket to put the gum in.  I taped it in as well so it wouldn't fall out.


I taped the printable onto the front of the yellow card, cutting the bottom of the yellow card so it followed the bus shape.


My daughter wrote a cute note inside and we handed it to the bus driver the other morning.  I could see the smile on her face as she drove away.


Monday, June 24, 2019

Teacher Gifts: Thank you for helping me grow


This school year flew by.  I don't know if that's because everything was new, or because for the first time ever all of my kids were in school.  Even though school here in NY ends later than it did in PA, my kids haven't complained about still being in school the last week of June.  It might help that it's still spring like weather and not the hot and humid 80-90 degree weather we were used to at this time of year in PA.  

As usual, I like to give a little gift of my appreciation to the kids' teachers.  


This year I got my inspiration from THIS post I shared earlier on Facebook.
source

I was going to get some terra cotta pots and paint them, but I found an easier alternative.  These plants were already in some cute pots and only $4 at Walmart so I snagged a few to use as is.


Just needed to add the cute saying.  I printed it out and glued it to some colorful cardstock. 


Then I taped a BBQ skewer onto the back,


And just stuck it right into the pot.


Super cute and super easy.
  

I love how they turned out.


And the saying couldn't be more true.  Especially for my pre-K guy.  He has gone from being a shy guy to such a friendly fella.  I'm so thankful for such good teachers who genuinely care about my kids and not only help them academically but socially as well.  My kids entered an unfamiliar school with zero friends, in a new neighborhood in a new state, and they have just flourished.


 Thank you teachers everywhere!


Subscribe to CONTROLLING Craziness and get my blog updates via email.   Don't miss anymore posts, click HERE to get email updates.

And don't forget to follow me on FacebookTwitterGoogle+, and Pinterest.

Monday, June 17, 2019

Garage Door Makeover for under $12


Since moving into our new home almost 10 months ago, we have made a couple of changes.  One of the easiest and cheapest was to give our garage door a little makeover.  


I thought our garage door looked a bit plain and could use a little something to dress it up. 


It's a 2 car garage door so it's wide plus all that white = boring.


A quick Pinterest search and I discovered you could add some hardware like handles and hinges to dress it up.  
(P.S.  I'm also eyeing up some new bigger and darker outdoor lights to add more contrast and interest.  Those little silver lights just aren't doing it for me.  You know how one project leads to another, right.)


And the best part, they were magnetic.  No need to drill holes or screw anything into the garage door itself.  Doesn't get any easier than that.  


The even better part, was that they were just under $12!  I couldn't buy them fast enough.  I love how they add a bit of interest to an otherwise boring expanse of white.


Here's the link so you can dress up your garage doors too!


(Update:  We've had them on our garage door for a few weeks now and there have been no issues.  They have stayed put through the wind and rain and with the door being opened and closed.  I would suggest not letting your little ones see you put them on.  My 4 year old knows they are magnetic so every once in a while I notice the handles have been moved.  Luckily it's an easy fix to put back into place.)


Subscribe to CONTROLLING Craziness and get my blog updates via email.   Don't miss anymore posts, click HERE to get email updates.

And don't forget to follow me on FacebookTwitterGoogle+, and Pinterest.