Click below to shop amazon and support my blog. Thank you!

Showing posts with label decorations. Show all posts

Monday, July 1, 2019

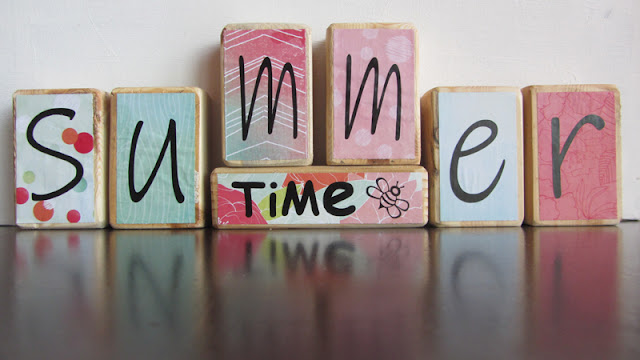
DIY Reversible Summer / 4th of July Blocks


We  had a craft day at church the other weekend and I was in charge of this craft.  Perfect for a summer time display.  It is super cute and super easy to make.


You need 7 blocks.  I think we had 2x4's cut into the following sizes (you don't have to be exact):
6 blocks cut to 2.5" by 4"
and 1 block cut at 2" by 6"


The blocks were sanded and left as is for our project, but you could stain or paint them if you wanted.

Then we used patriotic and summer colored scrapbook paper cut to fit inside the blocks.  6 patriotic colored papers and 6 summer colored papers were cut to 2 1/8th" by 3.5".  One patriotic paper and one summer paper was cut to 1 3/8" by 5.5".  

Vinyl lettering was cut out using my Silhouette machine and applied to each paper.

Then the paper was Mod Podged to the blocks.  I just applied Mod Podge to the block and then smoothed the paper on top.  You could also apply Mod Podge over the paper for a more durable or shinier finish.


I love a 2 for 1 decoration.  I have mine turned to summer right now but when July rolls around, I'll flip it to the patriotic side and then flip it back to summer to use until school starts.


The idea was found HERE and the possibilities are endless.  You could make these for Easter/Spring, Winter/Valentine's Day, or any holiday and season.  I love a simple, easy and versatile craft. 


Subscribe to CONTROLLING Craziness and get my blog updates via email.   Don't miss anymore posts, click HERE to get email updates.

And don't forget to follow me on FacebookTwitterGoogle+, and Pinterest.

Thursday, January 25, 2018

DIY Valentine's Day Wood Conversation Heart Wall Hanging

I've been wanting to make these wooden conversation hearts for a while now.  Three years to be exact.  Go ahead and read THIS POST to refresh your memory, I'll wait.  


Well, I finally got around to doing it.  Earlier this summer I found some wooden heart plaques, I wasn't even looking for them.  Every other time I happened to be at a craft store and happened to remember to look for the wooden hearts, I couldn't find them so of course I had to get them.


The first step was to paint the hearts in pastel colors.  I used some of the acrylic paint my daughter got for Christmas and added some white to it so it would be lighter.


Then, I used my Silhouette machine to cut out the names in a dark pink vinyl.


I was on a roll and did this much in two days.  Then, I couldn't find the staple gun.  So my progress came to a halt.  Finally I took the time to really look for it and there it was, neatly put away with the rest of the tools in the garage.  For some reason I thought it would have been left out with the last staple gun project which, by the way, is still unfinished and sitting in the basement.  


After a two week hiatus for this project, I picked up where I left off by stapling some wide ribbon to the back of each wooden heart.  I used dark pink ribbon to match the vinyl letters.

Then I doubled over the top of the ribbon and put a key chain type ring on it so I could hang it.  


I didn't want the ring to show so I prettied it up with a bow made out of the same ribbon.


In my original post about wanting to make these wooden hearts, I thought I would hang them in the foyer.  Then I realized that might look weird since I don't have any other Valentine's Day decor in there.  So I decided to hang on the wall next to my fireplace since the mantel is where all my Valentine decor is.  

This is the before picture of that wall.  I just took down the two pictures and hung the hearts from the top nail.  


The ribbon and hearts cover up the bottom nail so it all looks nice, and not too low for little ones to pull at.


Here's the Valentine decor on the mantle.  In the original post I mentioned how I wanted to make a cute heart banner.  Well, I never got around to making that but I did find this pre-made heart banner at an after Valentine's Day clearance.


I still display the 'You & Me' sign, which is just a gift bag I put into a frame (you can read all about that in THIS POST), and the infinite love block I made in THIS POST.


I still haven't made the LOVE blocks, but I did add this LOVE sign.  It's just a thin wooden LOVE key glued onto a card stock frame.


From this angle you can see all the Valentine decor.  


What Valentine crafts have you made?  Link up in the comments below.


I would love for you to follow me on FacebookTwitterGoogle+, and Pinterest.

Tuesday, March 31, 2015

Hoppy Easter Sign and more Holy Week activities

Friday was in the 60's here in PA, I thought spring had finally arrived.   I got out all the summer baby clothes that had been stored in the basement so I could wash them and get them ready to be worn.  My 4 yr old went for a bike ride without a jacket.  I even made an Easter decoration for the mantle.
So imagine my surprise when on Saturday, we woke up to snow.  There was a light dusting on the grass and it snowed off and on throughout the day.  And again on Monday, a few more flurries.  It's been a long, cold and snowy winter here.  I am so ready for spring.  I just had to make something to brighten up the place so I made this "Hoppy Easter" sign.


It was really easy to make.  I used acrylic craft paint, wood, scrapbook paper and vinyl that I already had so this project cost $0!  I painted the wood pink on one side, and green on the back and sides.  I made those bunnies from scrapbook paper cut out with my Silhouette Cameo.  The image I found online and followed THIS TUTORIAL for how to cut your own images using the Silhouette.  I also used the Silhouette to cut out the white vinyl.  I attached it all to the block of wood, using Mod Podge to make sure it stuck.  And voila!  My one and only Easter decoration (for now).

Yes, I know my mantel is pathetic.  I need to add some more Easter decor and make it look more spring like.  And this point, I doubt I'll get to that, but at least I have one bright and colorful thing up there to make me think spring regardless of the weather.


In case you missed my last post with activities to do each day from now until Easter Sunday that focus on Christ, you can click HERE.  For the original inspiration and ideas for celebrating Holy Week, check out click HERE to go over to the Mercy River blog.

On Sunday we learned about Palm Sunday and reenacted Jesus' triumphant entry into Jerusalem.

On Monday we learned about Jesus cleansing the temple and acted that out too.

And today we'll learn about some of the parables Jesus taught.  There are several videos to watch and talk about in this lesson.

I am enjoying celebrating Holy Week with my kids.  We will have to make this a new Easter tradition.

Anyone else doing something special to remember the Savior this week?


Subscribe to CONTROLLING Craziness and get my blog updates via email.   Don't miss anymore posts, click HERE to get email updates.

And don't forget to follow me on FacebookTwitterGoogle+, and Pinterest.


Wednesday, February 11, 2015

Valentine's Day Decor

I don't usually decorate for Valentine's Day (except for last year when we made some paper heart wreaths), but when I saw THIS on Pinterest, I really wanted to make one.  

I had the perfect place to put it too.


Can't you just picture it on that skinny blank wall?  This is the view from the foyer when you first enter our house.  On the other side of the wall is the kitchen, the door to the left goes to the basement and to the right is the living room.

However, I thought that would look odd, having just one Valentine's Day decoration.  So I'd have to decorate some more.  The mantel seemed like an easy thing to decorate since you can also see it from the foyer as you enter our house.  See what I mean below?


A quick search on Pinterest and I decided I wanted to make THIS heart banner and some LOVE blocks similar to THESE below.  


First up was making the four wooden hearts with my kids names on them.  I looked at a few stores but couldn't find the large wooden hearts used to make this project, plus it was almost February when I saw the idea which left me with 2 weeks to make and display it.  I didn't think that was going to happen, so rather than stress myself out, I've decided to make it for next Valentine's Day.  

In fact, I'm sure I'll find more cute holiday decor to DIY when I browse Pinterest and have decided to dress up my mantel for each holiday... next year, that is.  Why stress out trying to get it all done this year when I can shop the after holiday sales, and have an entire year to make my projects?  In case you are wondering what's been taking up a lot of my time, well it's this little guy.


Subscribe to CONTROLLING Craziness and get my blog updates via email.   Don't miss anymore posts, click HERE to get email updates.

And don't forget to follow me on FacebookTwitterGoogle+, and Pinterest.


Tuesday, March 26, 2013

COWBOY Themed Chili Cook Off

Our church had a Chili Cook Off Friday night.  It was a western cowboy theme.  I helped out with the decorations and got some great ideas from this cowboy themed blue and gold cub scout banquet HERE.

We don't live out west, so we didn't have many western props.  We made due with what we had and I spend $0 on decorations, just using stuff I already had. 

I started with the cowboy bunting.  Instead of using bandannas or scraps of fabric, I used scrapbook paper in an Americana theme.  


 Each 12 x 12 sheet yielded 8 triangles that I sewed together with my sewing machine.  


I hung them up around the gym with some cowboy quotes that I found online.


In case you are ever in need of some clean cut cowboy quotes, here are the ones I used: