Click below to shop amazon and support my blog. Thank you!

Showing posts with label decorating. Show all posts

Monday, July 1, 2019

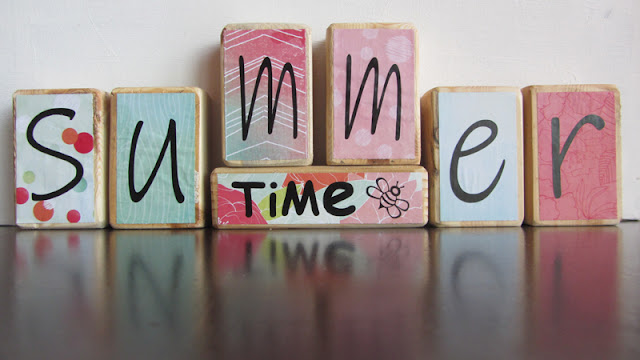
DIY Reversible Summer / 4th of July Blocks


We  had a craft day at church the other weekend and I was in charge of this craft.  Perfect for a summer time display.  It is super cute and super easy to make.


You need 7 blocks.  I think we had 2x4's cut into the following sizes (you don't have to be exact):
6 blocks cut to 2.5" by 4"
and 1 block cut at 2" by 6"


The blocks were sanded and left as is for our project, but you could stain or paint them if you wanted.

Then we used patriotic and summer colored scrapbook paper cut to fit inside the blocks.  6 patriotic colored papers and 6 summer colored papers were cut to 2 1/8th" by 3.5".  One patriotic paper and one summer paper was cut to 1 3/8" by 5.5".  

Vinyl lettering was cut out using my Silhouette machine and applied to each paper.

Then the paper was Mod Podged to the blocks.  I just applied Mod Podge to the block and then smoothed the paper on top.  You could also apply Mod Podge over the paper for a more durable or shinier finish.


I love a 2 for 1 decoration.  I have mine turned to summer right now but when July rolls around, I'll flip it to the patriotic side and then flip it back to summer to use until school starts.


The idea was found HERE and the possibilities are endless.  You could make these for Easter/Spring, Winter/Valentine's Day, or any holiday and season.  I love a simple, easy and versatile craft. 


Subscribe to CONTROLLING Craziness and get my blog updates via email.   Don't miss anymore posts, click HERE to get email updates.

And don't forget to follow me on FacebookTwitterGoogle+, and Pinterest.

Friday, June 29, 2018

Airplane Prints


I wanted to do a follow up with all the information about these cute airplane prints that I used as decoration for the Airplane Themed Baby Shower I posted about earlier.  My sister is doing an airplane theme in the baby's room and I thought these prints would go perfect in there.  I found them HERE


At first I thought I could used the white pen in my Silhouette machine to print these out on navy card stock, but nope.  Instead of drawing the plane with the white pen, the Silhouette machine traced where the lines should have been.  You can see what I mean below.  I googled all about it and didn't find a way to fix it.


So I just had them printed out at Walmart and they turned out great.  


I ordered some industrial looking frames to go with the industrial airplane look of the baby's room, but they didn't come in before the baby shower so I used some white wooden frames that I had.  I like the white frames with the white airplane on the navy background.


Here they are in the metal frames and I love that look too.


You could also print them out at home in a black and white version which looks great too.  


Thanks so much to Nest For Less for sharing her vintage sketch airplane posters with us.


Subscribe to CONTROLLING Craziness and get my blog updates via email.   Don't miss anymore posts, click HERE to get email updates.

And don't forget to follow me on FacebookTwitterGoogle+, and Pinterest.

Friday, May 26, 2017

From Blanket to Valance

The window in the girls' room had a very dark purple valance on it.  It looked a bit too formal in a kid's room, plus I wanted to lighten things up a bit.  Last year (yes, this is another long overdue post) I bought this cool Ofelia blanket from Ikea.  Ikea sells something with the same name, but it's a different type of material.  The actual blanket I have can be found on amazon.com HERE.  It's more of a gauzy delicate fabric where the one Ikea sells now is a thicker yarn like fabric.  Of course, I wasn't planning to use it as a blanket anyway.  I knew all along it would make the perfect light and airy and oh so feminine valance I'd been looking for.  Just perfect for a little girl's room.


Here is the dark purple valance that I started with.


And here's the new light and airy valance that's in the girls' room now.  I like it so much better.  It really brightens up the space too.


For starters, I took down the old valance and removed the old curtain rod. 


I hung the new curtain rod up a little higher so the valance would hang higher allowing more of the window to show and add even more light to the room.  I'm not too worried about the holes in the wall where the old curtain rod was.  Eventually I'll get to painting the room but for now, the new valance should cover them up.  I just so happened to have this flowered curtain rod so I used that which also added a little more of a feminine touch to the room.  


First I draped the blanket over the curtain rod.


I  used some ribbon to sew loops to hold up part of the blanket.


The ribbon loops were made from the same ribbon I used to make the girls barrette holder.  You can read all about how I did that over at THIS POST.

Adding the loops of ribbon turns it from a blanket into a valance.


I love a good before and after.  In person it looks so much better with the new valance just letting all that sunlight stream in.


Subscribe to CONTROLLING Craziness and get my blog updates via email.   Don't miss anymore posts, click HERE to get email updates.

And don't forget to follow me on FacebookTwitterGoogle+, and Pinterest.


Monday, February 6, 2017

Valentine's Day Garland


I had to buy some pom poms for my daughter's science project.  She was making a model of the chemical element Fluorine.  She needed pom poms to represent the electrons.  We bought a bag of various brightly colored pom poms at the craft store.  She used purple for her electrons and I figured I could use the leftovers for holiday decorations.  I took out all the red and pink ones, arranged them in a pattern and threaded them together.  With the other colors, I figure I can make a St. Patrick's day garland, an Easter garland and a Spring garland.  Since they are just strung together using needle and  thread, I can easily undo them to create whatever pattern I want.  


I just hung them up on my mantel to decorate for Valentine's Day.  Now I need to get working on those 'LOVE' blocks I mentioned in my last post so my Valentine's Day decor doesn't look so sparse.


How do you decorate your mantel for Valentine's Day?  


Subscribe to CONTROLLING Craziness and get my blog updates via email.   Don't miss anymore posts, click HERE to get email updates.


And don't forget to follow me on FacebookTwitterGoogle+, and Pinterest.

Friday, October 14, 2016

Decorating Your Home For Fall on the Cheap

With the change of seasons, many people like to change their home decor.  I'm not talking about just bringing out a few seasonal decorations (which is what I usually do), I'm talking about a whole new look to the living room.  Transitioning from a light and airy summer look, to a warm and cozy fall look doesn't have to cost a fortune.  The change can be done by swapping out a few things such as curtains, pillows, throws, and the accent decorations you have on your tables, bookshelves and mantles.  I'm always looking to save money so I try to buy second hand when I can.  Yard sale and thrift stores are great places to find seasonal decor.  

In my area there are 8 thrift stores within about a 30 minute drive from each other.  For all you local folks, here's a link to an article that tells a little about each one HERE. That's a lot of places to find good deals.  Some stores like Goodwill, get new items (usually overstocks) from Target.  You never know what you'll find and just like regular retail shops, they also stock their shelves seasonally and get in new items all the time.

Recently I got two new blackout curtains.  They are the Threshold brand from Target.  They were marked $9.99 each but I got them even cheaper because of a 50% off sale.  Most stores have some sort of sale going on each day.  You just need to check what color tickets are discounted when you walk in and you can score pretty good deals, as if shopping second hand wasn't cheap enough.


I love autumnal colors and a few rooms in my house are decorated in these warm colors already including my bedroom.  I used to have off white curtains in there which matched the bedding but did little to block out the light.  I love these warmer colored curtains and the light blocking feature is amazing.  Now if only I had the time to sleep in.


One of the thrift stores even has a blog you can check out HERE.  It gives ideas about decorating and such.  This cute little wreath would make a great front door decoration for fall.

DSC_6945


Besides shopping thrift stores, I love to yard sale.  I found this wreath for FREE last week and hung it up on my wreath hanger outside.  On the other side of the door is a fake pumpkin my mom was getting rid of.  I've had several people think that pumpkin is real and compliment me on my pumpkin carving skills.  


I'm still working on decorating my front porch.  I need to add some mums to those flower pots and then I'll call it done.


Antiques and vintage decor and a nice warm and cozy feel to any home.  If you want to add some antiques into your fall decor, you can find them at thrift stores but you might want to check out antique stores as well.  There are lots of antique stores in Bucks Co. PA and THIS articles lists them all along with other favorite antique shops all over the US and tips for finding antiques in any state.

New Hope, Bucks County. Photo courtesy of Visit Bucks County


I'd love to hear how you find good deals on seasonal decor, just comment below.  I also love to shop after season sales so I can get a jump start on next year's decorations.


Subscribe to CONTROLLING Craziness and get my blog updates via email.   Don't miss anymore posts, click HERE to get email updates.


And don't forget to follow me on FacebookTwitterGoogle+, and Pinterest.

Tuesday, February 3, 2015

How to Move Heavy Furniture by Yourself

It's  no secret that I love to rearrange furniture in an attempt to change the look of a room or find the most efficient use of space.  That's why I love using furniture sliders.  You just place them under the 'legs' of the piece of furniture you want to move, and it allows you to easily slide it around to the new position.  


Over a year ago, I decided to move my crafting armoire that is in our master bedroom sitting room from one side of the room to the other.  The reason being that it was currently on the right which is the side that leads to the closet.  The left side was a larger area so I thought it should go there and free up the path to the closet.  At one time we had a loveseat on the left side but decided to move that to the living room so the left side was empty (or rather would have been empty if I didn't fill it up with stuff that really belonged elsewhere).  The picture below shows the left side with all the clutter put away, just needed to find a new place for the bookcase and chest.  See how the armoire on the right blocks the door to the closet?  And how there is more space on the left side to put it?


The first thing I tried was my furniture sliders.  This armoire is so big and heavy that I couldn't lift up an end to slip the furniture slider under.  Of course I was in a furniture rearranging mood and couldn't wait several hours for my husband to get home to help. So I had to figure out a way to move this thing by myself.  

I decided to give the car jack a try.  

That's right, a car jack.  

I figured I could jack up the armoire and then slip the furniture slider under it to move it to the other side.  That's exactly what I did and it worked!


Once the furniture sliders were in place, I just had to slide it across the room.  It was still difficult to slide it because it was so heavy, but it was doable.  

I kept the Babes occupied while I rearranged with some target practice.  To my surprise, she was actually able to shoot a few balls into the baskets below.


It's a good thing I rearranged and cleared out our sitting room over a year ago because four months ago we had a baby and that's his room now.  His cradle is on the right and the armoire is still on the left. 


Subscribe to CONTROLLING Craziness and get my blog updates via email.   Don't miss anymore posts, click HERE to get email updates.

And don't forget to follow me on FacebookTwitterGoogle+, and Pinterest.

Tuesday, March 26, 2013

COWBOY Themed Chili Cook Off

Our church had a Chili Cook Off Friday night.  It was a western cowboy theme.  I helped out with the decorations and got some great ideas from this cowboy themed blue and gold cub scout banquet HERE.

We don't live out west, so we didn't have many western props.  We made due with what we had and I spend $0 on decorations, just using stuff I already had. 

I started with the cowboy bunting.  Instead of using bandannas or scraps of fabric, I used scrapbook paper in an Americana theme.  


 Each 12 x 12 sheet yielded 8 triangles that I sewed together with my sewing machine.  


I hung them up around the gym with some cowboy quotes that I found online.


In case you are ever in need of some clean cut cowboy quotes, here are the ones I used: