Click below to shop amazon and support my blog. Thank you!

Showing posts with label Halloween. Show all posts

Tuesday, October 30, 2018

Pumpkin Carving


The kids had off school on Friday so we spent the better part of the day carving and painting our pumpkins.  I didn't want to do it too much earlier in the month because Saturday was the pumpkin carving contest at our church Trunk or Treat and I wanted our pumpkins to look their best.  


I had these grand ideas of how the pumpkins would look thanks to Pinterest, but you know how that turns out, or rather how it doesn't turn out.  The only one that looked great was my 14 yr old daughter's pumpkin that she made into an owl.  It doesn't really matter how they turned out, we all had fun and that's the most important part, right?

The little kids started off by painting their pumpkins.  My 4 yr old painted his white pumpkin gold while my 8 yr old painted her orange pumpkin white.  Since the orange pumpkin was big, we found that a regular paint brush rather than a craft or artist paint brush worked best.  


While I was helping my daughter, my son got into the pumpkin carving set and used one of the tools to make lots and lots of little holes in his pumpkin.


Then he wanted me to carve it out like a pterodactyl.  


He's really into dinosaurs lately and I thought I had talked him into a dinosaur pumpkin that would look something like THIS...


but at the last minute he changed his mind and really wanted a pterodactyl.  In my defense he did help by making the wings bigger and cutting off part of the head, so if you can't tell what it is, I don't blame you.


My 8 yr old had a plan to make ghost pumpkins and I think they turned out pretty great considering she did most of the work herself.  I think her favorite part was scraping out the insides.


My 14 yr old is very artistic and decided she wanted to make an owl pumpkin.  HERE is her inspiration from Pinterest:


and her version which I think turned out even cuter (although the eyes were harder to make than we thought):


She started by cutting out the eyes and beak,


We washed and cooked the seeds and then she hot glued them onto the pumpkin to make feathers and wings.


She also used black paint on parts of the seeds to make them stand out against the white pumpkin.


Like I said, she is very artistic.


I couldn't let the kids have all the fun and since my older son declined to participate in this activity I got to carve his pumpkin.  Once again Pinterest provided the inspiration with THIS idea:


And here is my version.  It turned out happy instead of scary.  Carving pumpkins is harder than it seems and I've got to give a lot of credit to those super creative (or patient) pumpkin carvers out there.


We entered my and my daughter's pumpkins into the pumpkin carving contest.  My daughter's owl pumpkin came in first place.  


Subscribe to CONTROLLING Craziness and get my blog updates via email.   Don't miss anymore posts, click HERE to get email updates.

And don't forget to follow me on FacebookTwitterGoogle+, and Pinterest.

Monday, October 29, 2018

Heads in a Jar Halloween Trunk or Treat


Saturday our church hosted a Trunk or Treat.  I saw this eerie Head in a Jar Halloween Decor on Bower Power  and decided that would be my theme.  You know me, I love a good theme.  So besides just having heads in a jar, I also dressed up like a mad scientist.  


It was a pretty simple theme to pull off.  First I took pictures of the kids and myself.  We laid down on the floor with a black blanket for a background.  I even fanned out the girls hair so it would look like it's floating in water.  I also squished up my face so it would look like my face was squished in the jar.  


As for the jars, I just used some mason jars I had on hand and filled them with different colored water.


Then I added the pictures to the jar.  I didn't do anything special with the pictures, just used regular photo paper and did not laminate them or anything.  I just needed this to last one night.  (FYI:  I had tested this out by putting a photo in a jar of water the week before and after a week, it still looked good.)


As for my costume, again it was easy to pull off.  I just borrowed my husbands white dress shirt to act as a lab coat.  I teased up my hair so it was pretty much sticking straight up and put on some goggles from a previous years Minion Halloween costume.  I also had some rubber gloves on.


Because it was raining, trunk or treat was held in the church.  Each person got to decorated a classroom instead of their trunk.  All the classrooms were taken so I got the kitchen which worked out perfectly.  It made it seem more like a laboratory.  I set up the heads on the metal cart with the "heads wanted" sign and a large bowl full of brains (cooked spaghetti noodled dyed a grey/purple color). 


As the kids came by to do their trick or treating, I showed them my collection of heads.  I said the heads wouldn't fit in the jars so I had to take their brains out and encouraged them to feel the freshly removed brains.  The kids loved it and my room soon drew a crowd.  

It was a fun night.  Besides the various room to go trick or treating to, there were several games for the kids to play, some face painting and even a pumpkin carving competition.  My daughter won first place for her pumpkin.  I'll have to do a post on that next.


This might have been my favorite (and easiest) trunk or treat theme so far.  If you are curious what I've done in previous years be sure to check out these themes below:


Subscribe to CONTROLLING Craziness and get my blog updates via email.   Don't miss anymore posts, click HERE to get email updates.

And don't forget to follow me on FacebookTwitterGoogle+, and Pinterest.

Friday, October 26, 2018

Corny Halloween Card


It's been a while since I've blogged.  Life has been busy.  We moved from PA to upstate NY in August.  The kids are adjusting better than expected to their new schools and the new house is mostly unpacked and settled in.  I even took some time to do something crafty.  My inspiration came this:


It's actually a paper bag, but I thought it would make a cute card.  I'm thinking it would be a cute wooden decor item too, just use some Mod Podge to glue the papers onto wood.  Check out Little Paper Sprinkles to see her other ideas.

Anyway, this is pretty much self explanatory just by looking at it but I'll walk you through how I made it.

1.  Cut paper to size. 

2.  Glue smaller papers to card.

3.  Draw face

4.  I used my finger and some paint, to put a small dab on for the rosy cheeks.

5.  I used some black tulle to make a bow and glued that on.  
I also added a 'corny' saying on the back and a "Happy Halloween".
Then slipped it in an envelope to mail off to my kids cousins.

Cute, quick and easy - that's my kind of craft project.    

What Halloween crafts have you made recently?  


Subscribe to CONTROLLING Craziness and get my blog updates via email.   Don't miss anymore posts, click HERE to get email updates.

And don't forget to follow me on FacebookTwitterGoogle+, and Pinterest.

Wednesday, November 1, 2017

DIY Ghost Candy Stand for Halloween 2017


Since we walk around the neighborhood on Halloween night, we leave a bowl of candy outside for the Trick or Treaters.  This year instead of just leaving my candy bowl on a stool, I quickly made this ghost candy stand at the last minute.  And I mean the very last minute.  It was 5:50pm and trick or treating starts at 6pm.  


My sister in law shared THIS cute idea from Sadie Seasongoods on Facebook and I just had to do it.  

I put a red bowl on top of a stool and draped it with an off white twin flat sheet because that's what I had on hand.


Then I put my Halloween bowl inside the red bowl and added some Duct tape I had cut into ovals for the eyes. 


I'd say this is another Pinterest success.  That makes two in one week.  I'm on a roll!  My last Pinterest success was my daughter's DIY Gumball Machine costume.  You can check that out HERE.


And speaking of costumes, here are my three youngest.  My 14 year old son decided to sit this year out.  I also added a few more decorations to the front of the house just for tonight.  


My younger daughter went as Batgirl,


and my little guy was his favorite super hero - Batman.  He ran/flew around the yard making it hard to get a picture.


Until he noticed the candy bowl.  Here he is trying to sneak a piece before meeting up with the neighbors to go trick or treating.


And here's the neighborhood gang.  These kids ran from house to house collecting candy and had so much fun.


Here's how our house looked from the street.  I'm loving the ghost candy stand and how you can see it from a few houses away.  I just might have to do this every year.  


Hope you all survived the post trick or treating sugar high.  Our kids didn't have any problems going to bed, except for the three year old.  It took an hour for him to stop coming out of his room after we put him to bed.  


Subscribe to CONTROLLING Craziness and get my blog updates via email.   Don't miss anymore posts, click HERE to get email updates.

Tuesday, October 31, 2017

DIY Gumball Machine Costume

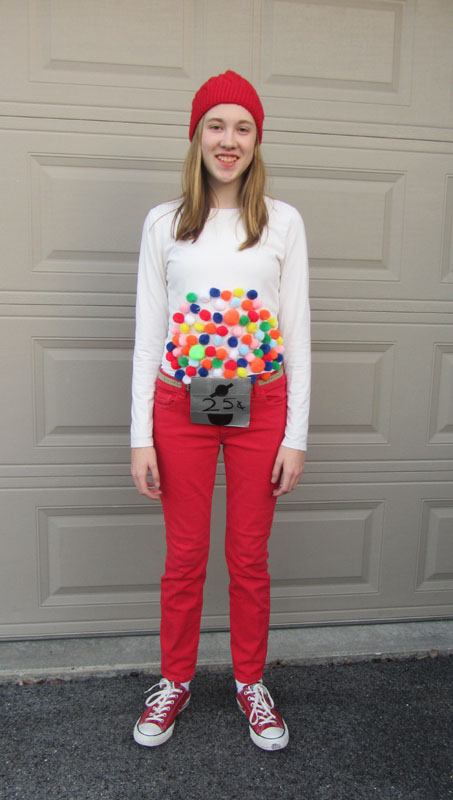
This year for Halloween, my oldest daughter will be going as a Gumball Machine.


She is getting a bit old for trick or treating, but she does have two younger siblings to take around with her so I'm sure she'll be able to score lots of candy as well.  Plus our church does a Trunk or Treat and it's not limited to just the little kids.  You can check out my previous post HERE to see how we decorated our trunk.   

In deciding what to be, my daughter and I looked on Pinterest for "Easy DIY teenage girl Halloween costumes" and decided on THIS one.  
I think we came pretty close to the inspiration and so I'll call this a Pinterest Success!

OK, now onto how we made this costume.  Luckily we had most of the supplies and just had to buy the pom poms and red pants.  I bought the red pants at a thrift store for $3.  They are Michale Kors brand.  Yeah, I'm sometimes amazed at the name brands we have at our local thrift store. 


Using a hot glue gun, I just glued the poms poms right to the white shirt. 


For the sign we just covered some paper with Duct tape and wrote on it with a black Sharpie.  We made some belt loops out of Duct tape on the back so she could wear it on her belt.


Classic red Chucks add a little more cool to this costume.  
Aww, isn't she so cute.


Happy Halloween! 


Subscribe to CONTROLLING Craziness and get my blog updates via email.   Don't miss anymore posts, click HERE to get email updates.