Click below to shop amazon and support my blog. Thank you!

Showing posts with label Valentine's Day. Show all posts

Wednesday, February 14, 2018

Loads of Love


Here's a simple Valentines craft for the kiddos.  
Just cut out a truck silhouette, glue to paper and add some heart stickers.  


I used my Silhouette cameo for this but it would be easy enough to draw freehand or print out from your computer.


I actually had it framed on a shelf in my son's room (you can see it in the picture below) but now he'd rather have Batman, so I'm slowing switching out some of his decor. 


My son was able to add the heart stickers himself and I wrote the cute saying on it. 


Now it's ready to give to his Valentine.  And just who is the lucky lady.  Well, that would be his cousin.  They are about 1.5 years apart and ever since she was born, my son has had a special bond with her, always trying to hold her and protect her.

Image may contain: one or more people and child


Happy Valentine's Day


Subscribe to CONTROLLING Craziness and get my blog updates via email.   Don't miss anymore posts, click HERE to get email updates.

And don't forget to follow me on FacebookTwitterGoogle+, and Pinterest.

Tuesday, February 13, 2018

Valentine Cards for Cousins

Our kids have several cousins that live far away.  We try to keep in touch but it's hard to make phone calls with different time zones and different schedules/activities going on.  Email/text/messaging is OK, but the little ones aren't able to do that.  So I like to send mail.  I know it's old fashioned, but what kid doesn't love to get mail. 

We made these cards the other day to show our cousins some love.  I mostly use my Silhouette Cameo to cut out vinyl.  You can check out some of those projects HERE, HERE and HERE.  This time I used it to cut out card stock and made a card with it.  I feel like I've opened up a whole new world of possibilities now. 


P.S.
I found the 'Love' image HERE.


Subscribe to CONTROLLING Craziness and get my blog updates via email.   Don't miss anymore posts, click HERE to get email updates.

And don't forget to follow me on FacebookTwitterGoogle+, and Pinterest.

Monday, February 12, 2018

Sexy Socks


I never know what to get my husband for the holidays so recently I've been using candy as my go to.  And yes I'll get him some candy for Valentine's day but I also couldn't resist getting him more sexy socks.  A couple Christmases ago, I spiced up his sock collection with some bold Argyles.  You can read about that HERE.  I found similar socks in red the other day and just had to get them for Valentine's day.  Of course I couldn't wait until Wednesday and wanted to give them to him earlier so he could wear them to church.  I made a cute little tag and put them in his sock drawer.  What a cute way to surprise him in the morning when he gets ready.  


The tag I used on this pair of socks says "A little something to spice up your socks life".


What do you get your sweetheart for Valentine's day, or any holiday for that matter?


Subscribe to CONTROLLING Craziness and get my blog updates via email.   Don't miss anymore posts, click HERE to get email updates.


And don't forget to follow me on FacebookTwitterGoogle+, and Pinterest.

Thursday, January 25, 2018

DIY Valentine's Day Wood Conversation Heart Wall Hanging

I've been wanting to make these wooden conversation hearts for a while now.  Three years to be exact.  Go ahead and read THIS POST to refresh your memory, I'll wait.  


Well, I finally got around to doing it.  Earlier this summer I found some wooden heart plaques, I wasn't even looking for them.  Every other time I happened to be at a craft store and happened to remember to look for the wooden hearts, I couldn't find them so of course I had to get them.


The first step was to paint the hearts in pastel colors.  I used some of the acrylic paint my daughter got for Christmas and added some white to it so it would be lighter.


Then, I used my Silhouette machine to cut out the names in a dark pink vinyl.


I was on a roll and did this much in two days.  Then, I couldn't find the staple gun.  So my progress came to a halt.  Finally I took the time to really look for it and there it was, neatly put away with the rest of the tools in the garage.  For some reason I thought it would have been left out with the last staple gun project which, by the way, is still unfinished and sitting in the basement.  


After a two week hiatus for this project, I picked up where I left off by stapling some wide ribbon to the back of each wooden heart.  I used dark pink ribbon to match the vinyl letters.

Then I doubled over the top of the ribbon and put a key chain type ring on it so I could hang it.  


I didn't want the ring to show so I prettied it up with a bow made out of the same ribbon.


In my original post about wanting to make these wooden hearts, I thought I would hang them in the foyer.  Then I realized that might look weird since I don't have any other Valentine's Day decor in there.  So I decided to hang on the wall next to my fireplace since the mantel is where all my Valentine decor is.  

This is the before picture of that wall.  I just took down the two pictures and hung the hearts from the top nail.  


The ribbon and hearts cover up the bottom nail so it all looks nice, and not too low for little ones to pull at.


Here's the Valentine decor on the mantle.  In the original post I mentioned how I wanted to make a cute heart banner.  Well, I never got around to making that but I did find this pre-made heart banner at an after Valentine's Day clearance.


I still display the 'You & Me' sign, which is just a gift bag I put into a frame (you can read all about that in THIS POST), and the infinite love block I made in THIS POST.


I still haven't made the LOVE blocks, but I did add this LOVE sign.  It's just a thin wooden LOVE key glued onto a card stock frame.


From this angle you can see all the Valentine decor.  


What Valentine crafts have you made?  Link up in the comments below.


I would love for you to follow me on FacebookTwitterGoogle+, and Pinterest.

Monday, January 22, 2018

FREE Valentine's Day Printables

This weekend was a warm one, in the 50's.  The snow and arctic cold seems to be gone, at least for the next week or so.  I know other parts of the country are still getting blasted with snow storms, best of luck to you and stay warm.  So whether you're stuck in the house and looking for something crafty to do, or just getting ready for the next holiday, these Valentine's Day printables would make a cute project.  


Valentine’s Day is virtually around the corner. It’s the time of year when people rise to the challenge and express love in new and unique ways. With this in mind, Customlables.net has created some editable Valentine’s Day stickers.  You can download the free, editable labels HERE. There are several different kinds cute for kids of all ages.  They can be used for party decoration, creating cute crafts, tagging gifts, writing heartwarming or funny notes and more.  You could even print them out on adhesive paper to make them into stickers.  So many possibilities.  


Happy crafting!


I would love for you to follow me on FacebookTwitterGoogle+, and Pinterest.

Thursday, March 2, 2017

How to Turn a Gift Bag into Art

I love shopping the post holiday clearance racks.  You never know what will be left so I try to think of creative ways to use what I see if I'm not planning on storing it away for next year.  I happened to be at Walmart when they had their Valentine's Day stuff for 90% off and picked up a cute gift bag.  I liked the wood grain pattern on it and thought it would make a cute piece of art.


Here's the original gift bag.  Cute enough on it's own and I could have packed it away to use for next Valentine's Day, but instead I wanted to make something out of it.


Do you see that price tag?  It was already cheap but at 90% off, that means I scored it for just .09¢.


I wanted to display it on my mantel next Valentine's Day so I thought putting it in a frame would be the easiest way to do that.  Luckily I had the perfect size frame in my stash of unused pictures and frames in the basement.


I just cut the top of the bag off, where the holes for the handles were and it fit into the frame perfectly.


It looks cute with the infinite love block I made last year.  
Click HERE to find out how I made it.


Anyone else shop the after Valentine's Day sales?  What did you pick up?


This post has been shared on Tip Me Tuesday:  https://tipjunkie.com/tip-me-tuesday-1-15-18/


Subscribe to CONTROLLING Craziness and get my blog updates via email.   Don't miss anymore posts, click HERE to get email updates.


And don't forget to follow me on FacebookTwitterGoogle+, and Pinterest.

Wednesday, February 15, 2017

Valentine's Day Scavenger Hunt

Here's a recap of what we did for Valentine's Day with the kids.
While the three older ones were at school, my little helper and I made some treats.  
He helped lay the pretzels on the baking sheet and add the white chocolate candy melts on top.  Then I baked them in the oven at 200 degrees for about 5 minutes to soften up the candy melt so it would stick to the pretzels.  One I took them out, we added some red sprinkles.  He was so pleased with himself for making these that when the kids came home he could hardly wait to say, "Look what I made".


They don't do anything for Valentine's Day in middle school, but it's a big deal in Kindergarten.  My daughter had a mini party and passed out her own valentines as well as received valentines and candy, lots of candy.  Of course I had to make sure these kids were dressed in red to celebrate this day of love.


After dinner we had a Valentine's Day scavenger hunt.  I got the idea and clues from HERE.  I did have to tell the kids that they had to work together and wait for each other until they read the clues.  I had them running all over the house - from the living room, to the office, to the upstairs bathroom, back down to the kitchen sink, to the office again and then back up to our bedroom where the gifts were laid out on our bed.


After our scavenger hunt we watched a movie and had dessert.  I made THIS yummy cake that is so rich and chocolatey it doesn't even need icing.

Hope you all had a great Valentine's Day celebrating with the ones you love.


Subscribe to CONTROLLING Craziness and get my blog updates via email.   Don't miss anymore posts, click HERE to get email updates.


And don't forget to follow me on FacebookTwitterGoogle+, and Pinterest.

Monday, February 6, 2017

Valentine's Day Garland


I had to buy some pom poms for my daughter's science project.  She was making a model of the chemical element Fluorine.  She needed pom poms to represent the electrons.  We bought a bag of various brightly colored pom poms at the craft store.  She used purple for her electrons and I figured I could use the leftovers for holiday decorations.  I took out all the red and pink ones, arranged them in a pattern and threaded them together.  With the other colors, I figure I can make a St. Patrick's day garland, an Easter garland and a Spring garland.  Since they are just strung together using needle and  thread, I can easily undo them to create whatever pattern I want.  


I just hung them up on my mantel to decorate for Valentine's Day.  Now I need to get working on those 'LOVE' blocks I mentioned in my last post so my Valentine's Day decor doesn't look so sparse.


How do you decorate your mantel for Valentine's Day?  


Subscribe to CONTROLLING Craziness and get my blog updates via email.   Don't miss anymore posts, click HERE to get email updates.


And don't forget to follow me on FacebookTwitterGoogle+, and Pinterest.

Thursday, January 26, 2017

DIY Wooden Name Blocks

I made these cute wooden name blocks for my even cuter niece for Christmas.  They were pretty easy to make, the hardest part was choosing which pictures to put on them.  


I started with some 3" by 3" blocks that I got from a free bin at a yard same.  They were painted primary colors but I knew I could do something with them.


First I painted the edges in case they showed through.  Then I used Mod Podge to stick on some scrapbook paper.  The easiest way to do this is to cut the paper slightly bigger than the blocks, apply the Mod Podge to the block, add the scrapbook paper and use an X-Acto knife to trim it to the correct size.


After that dried, I sanded down the edges for a little distressed look and added the photos and vinyl lettering.


They can be displayed vertical or horizontally.


These would be father's day gifts too.  I wanted to make these for my husband for father's day but never got around to it.  He finally got them for his birthday which was in November.  My back up plan was to give them to him for Christmas.  It's nice to know I can beat some deadlines.


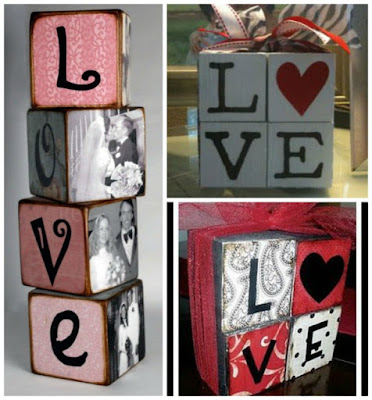
I'm also thinking of making some for Valentine's day.  Here are some ideas I found via Pinterest HERE, HERE and HERE.


Anyone else making things with wooden blocks.  I'd love to see what you've done.  Feel free to link up in the comments below.


Subscribe to CONTROLLING Craziness and get my blog updates via email.   Don't miss anymore posts, click HERE to get email updates.


And don't forget to follow me on FacebookTwitterGoogle+, and Pinterest.